Thunder Cross is a horizontal shooter which may have a story involving
blowing stuff up. There is no narrative to indicate this. Thunder Cross
is one of many horizontal shooters made by Konami, this one released in
1988.
Controls are exceedingly simple. Button A shoots. Button B positions your
options. Unfortunately, this is an old-school shooter so you'll need to
press A for each shot unless you like a very slow held fire. There are two
ships to choose from, Blue Thunder and Red Thunder for players 1 and 2.
Since they are the same except that Player 1 has blue highlights and Player
2 has red highlights, I'll detail the pickups instead of the ships.
S IS FOR SPEED
Collect the S to get an increase in speed. Unlike the Vic Viper, the T-45
doesn't start out flying through molasses and getting the speedup gives
just the right boost, never too fast. Once a speedup is collected, no more
will appear until the current life is lost, negating the danger of a too-
fast ship (just try playing any Gradius with four or five speedups).
O IS FOR OPTION
The Options from Gradius and Salamander are back and this time they get a
new look. Rather than the pulsing orbs of Gradius, these Options are
mechanical devices that fly alongside the T-45. Unlike Gradius, these
options don't trail the ship. Instead, they are always at a fixed
horizontal distance above or below. Pressing B will cause them to expand
and contract vertically. The bomb from Gradius has been removed, so moving
Options is required to effectively deal with ground-based enemies.
V IS FOR VULCAN
The weapon pods cycle through three different weapons starting with V. The
Vulcan shoots a fat bullet straight ahead. Collecting more V icons makes
the bullets fatter and increases the firing rate. Three of any weapon is
full power. At max power the rate of fire is high enough to make popcorn
enemies die in droves. The Vulcan's drawback is that it doesn't really do
much more damage per shot, and stays pretty weak even at max power.
B IS FOR BOOMERANG
Or maybe B is for Bounce, I'm not sure on this one. The B weapon shoots
out what looks like a laser boomerang straight forward. When the shot hits
an enemy or wall, it bounces vertically and will do a little more bouncing
before dissipating. At low power this weapon is practically suicide as it
is slow and while one boomerang is bouncing around, it prevents a new one
from being shot. At max level three boomerangs are allowed on screen
instead of two which helps. In some levels the boomerang can bounce along
the corridors to really curb stomp opponents.
T IS FOR TWIN LASER
Twin Laser in Gradius III just fired two narrow beams forward. This time,
it fires a beam forward and another behind. At full power, the standard
autofire is fast enough for the early game as the lasers are extremely long
and a new one will fire not long after the first one. Damage is average,
but the ability to shoot enemies coming from behind makes the Twin Laser a
prime choice.
After collecting four options, one speedup, and three weapon icons of any
kind, the next weapon icon will be a Special Weapon. These weapons convert
the options into giant fixed cannons, and pressing B now unleashes a much
more devastating attack. A bar in the lower left indicates the number of
uses left. When used up, the regular Options return.
L IS FOR LASER
Collecting the L will change the options into four huge laser cannons.
Each blast is as wide as the T-45 and does huge damage. The ammo supply is
pretty generous.
F IS FOR FLAME THROWER
Collecting the F will change the options into four torches. Pressing B
shoots out a flame tongue about half the screen's width. As long as B is
held down, this fire will stay on screen. While the Flame Thrower doesn't
seem to do as much damage as the other Specials, it uses less ammo as well
and cuts through enemies with ease.
N IS FOR NAPALM
Collecting the N will change the options into four grenade launchers.
Strangely, in life napalm would be used to burn rather than blow up, like
in some flame throwers. Here, the "napalm" is four bombs with big blast
radius but odd hit detection. Flying enemies seem to be affected by
touching the blast, but some of the hardier ground enemies like the hatches
that launch enemies in the first stage seem to require being hit by the
projectile itself to take damage. Nevertheless, the damage output is the
highest of the specials. The first boss can be destroyed with four well-
placed blasts.
? IS FOR ?
With a Special Weapon equipped, the icons will change to a question mark.
These can reward extends or points, or make a jingle without actually doing
anything it seems. I haven't figured these out entirely yet.
In addition to these items, positioning the options in walls and firing can
reveal what looks like a little octopus. These guys reward 10,000 pts. a
pop. The entire first stage before the boss might yield 50,000 on average,
so 10K is pretty significant here.
Gamers who grew up between the mid 80s and mid 90s could often figure out
who developed a game by listening to the music. Before the days of
powerful built-in sound processors and red book audio, any music a
developer wrote would have to be synthesized for play back on a game
machine, be it an arcade board or a home console. Almost like a signature,
the different developers created their own synthesized sounds and applied
them to numerous games. When the music starts in Thunder Cross, within
three notes it's obvious that this is classic Konami. The bass and drum
synths in particular sound almost perfectly recycled for Gradius III on
SNES, along with many other Konami games.
The overall level design of Thundercross is a bit more open than the
Gradius games, though manages to have a similar feel. None of the levels
have a starfield for a background, which does change it up a little bit. A
few levels also have pretty quick scrolling, though never the high-speed
tunnel runs as seen in Gradius II onwards. There are also no stages with
infinite vertical scrolling, in fact all of them are strictly horizontal
with no diagonal movement or other changes.


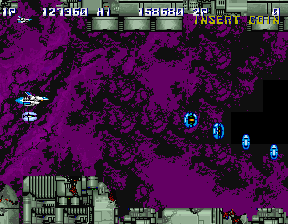
Stage 1 looks like a cave of some kind, with a smashed city visible in the
background. If it had a starfield background, this would look like Stage 1
of the first Gradius, rocks on top and bottom and flying through the
middle. Powerups appear by shooting groups of red enemies, which behave in
patterns very similar to the ones in Gradius. Also seen in this level are
volcanoes that tamely shoot blue flames and a few enemy generating pods.
In many shooters it takes multiple stages to reach full power but this
level gives enough powerups that by the boss, the T-45 is fully powered.
This level is pretty easy too, and it isn't much challenge at all to reach
full power.
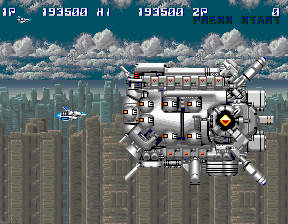
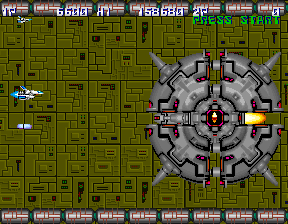
The boss fights in Thunder Cross use the SHOOT THE CORE gameplay of
Gradius, but generally don't feature variations on the Big Core. In Stage
1, the boss is a dome. It follows your movements, and occasionally lifts
the dome to fire at you revealing an orange gem. The orange gem is the
weak spot. After shooting it a bit, the dome rises up and a huge mecha
tentacle pops out underneath and harasses you. The dome conceals the weak
spot, and lifts up at times allowing it to be damaged. Once destroyed, the
gem actually flies off screen and a huge flying carrier arrives just in
time for a landing.

Stage 2 is a ruined city, presumably the one seen in the background of the
preceding stage. Rather than flying through the city, the level seems to
take place above it as the amount of open space is vast, sometimes with no
obstacles at all. Early on, it is necessary to fit through a hole in a
skyscraper with three enemy turrets in it. Otherwise a few shattered
buildings with built-in giant missiles make up the scenery. Enemies do
start to pile up later in the level, a nice taste for what's coming next.
This stage marks the debut of the rainbow laser, a thin laser with made of
many colors that seems to be harder to dodge than it should be. On that
note, while bullets can scrape the nose without damage, destructible
missiles seem to have much larger hitboxes than the sprites indicate and
even grazing one pixel resulted in my doom many times.
The Stage 2 boss seems to have some Compile inspiration. A crapload of
cannons, and missile bays on top and bottom. All must be destroyed to
reach the second phase. The front falls off, revealing more cannons and a
rainbow laser gun. The rainbow lasers only travel straight left, so with
even one option it's possible to stay out of the way and still win. With
no options, be prepared for evasion at all times as the rainbow laser gives
little time for reactions.
Stage 3 appears to be a shattered factory, with the machinery working just
well enough to make it more dangerous than if everything was 100% working
or destroyed. Small enemies will sit behind indestructible hunks of metal,
fly out and attempt to ram when passed then fly away while firing a bullet
or two. Some floating bits of junk are completely invincible despite
looking like enemies and need to be avoided.
The boss looks like a stripped down version of Stage 2's boss. Big and
gray, but just a few gun turrets. To change it up, this one has a tentacle
on top and bottom that reach out and fire a 3-way arc. On top of this, to
reliably hit the core a small shield needs to be destroyed. Strangely,
after how much harder the levels start to get this boss is pretty simple.
The tentacles don't aim very well, and once the gun pods are destroyed this
one is nearly neutered. There is no second phase to this boss.

Stage 4 is clear in it's R-Type influence. The entire stage is a giant
battleship fight. In R-Type, the battle was fought by flying around the
ship and taking it apart until reaching the weak point. In Thunder Cross,
the orange gem floats across the middle of the screen and the battle is
fought against an enormous mechanical version of the letter "U" turned on
it's side, with the curvy bit at the bottom being the weak point.
Honestly, the battle is more annoying than exciting as Konami uses many of
the same attacks already seen, and reduces dodging space to make it harder.
It's OK, but at this point R-Type still had the best giant battleship
fight.

Stage 5 is a factory stage that moves surprisingly fast. It isn't a high
speed dash, but I often find myself trying to get around something and
smacking into it at the last second. Be prepared. The level is all a
green, metallic affair with lots of right angles. I actually think it
looks like the Factory zones from Darius, like Zone B. Unlike most of the
game, this stage has several areas where pipes divide the screen into four
areas. There are no dead ends, but it is very difficult to squeeze from
the top to the bottom of the screen. As a tip, don't try to get powerups
in those sections until you've played the stage several times and know the
layout.
The boss is an absolute asshole. It start out looking a bit like the big
round boss from the Gradius boss rushes, the one that spams indestructible
missiles. It doesn't do that, opting instead for normal bullets. The four
quadrants of the circle pop open to signify the beginning of the battle.
When the front two are blown off, phase two begins which is asshole mode.
The two remaining quadrants and the core begin spamming long, red death
rays that are much harder to dodge than they need to be. Sit in a safe
spot, and if positioned too close you'll explode without seeing the actual
beam! Up until this point even at the hard parts the game was still fair,
but this pisses me off.
.png)

Stage 6 is a volcano, the requisite fire level. It actually looks a bit
like Stage 1, though the background seems to be a far shot of Stage 5. New
to this stage are rock (hard?) erections. One section is full of green
rocks with boulders that stick out. Shoot the boulders until the go down,
then hurry past before they get back up. Vaguely dirty, if you think about
it too hard. Look out for large vertical formations of enemies firing
aimed shots. By this point the enemies will fire multiple bullets so let
the powerup float to the left rather than try to grab it, and keep clear of
incoming projectiles.
The Stage 6 boss pissed me off a lot at first, until I realized something.
This boss is flame based, shooting lava rocks and flame arcs in front of
it. It also has four engines, pointed up, down, left and right. Nevermind
that such a setup would make it go nowhere. The flames coming out of those
jets are harmless, making it much easier to sneak past. Once I figured
this out, I beat this boss on one life with NO powerups.
The final level is a trip through a mostly blue corridor. More parallax
scrolling is evident in the backgrounds here. Popcorn enemies will fly in
from above and below in formation. Kill them quickly as they fire on the
way in and right before they leave the screen and that second shot often
crosses with the first one. Not good at all when 7 or more of these things
are doing that. This stage is also home to some turtle-looking things that
slowly approach at all times and take a few hits to kill. When these pile
up on screen, things get hectic quickly.
Make sure to come into this stage with as many lives as possible. The
previous stages can be credit fed, but losing all lives here is an instant
GAME OVER even with lots more credits in the machine. As such, I still
haven't seen the boss!
I'd recommend playing this game on the easy mode to start, selectable via
virtual dip switches in MAME. Bullet count is more manageable yet it isn't
a walk in the park, making it a fun challenge.
Before writing this up, I thought this game was an underrated shooter that
no one paid attention to. After playing through what my skills will allow,
I now see it as a game that tries to be Gradius with some R-Type thrown in
and it doesn't always work. Fans of classic Konami shmups should give it a
try. For anyone else, if you like Gradius try it otherwise this one is OK
to leave behind.
Overall: